
You want to install an update for Android car radio? No idea how to do that? Here I help you to understand the background! MTCB, MCU, HuiFei, Image and Pure Android are bohemian villages for you? But you still want to update your car radio? Great! Then you’ve come to the right place!
Inhalt:
CAUTION
This guide is not intended to replace any brain functions of those following it. This guide does not claim to be complete or even correct! In case you brik your radio, you suffer a data loss, you hurt yourself or break anything or anyone: I am not to blame for it! Everyone should know for himself what he can do and what he should better leave alone.
AND VERY IMPORTANT:
I have written this guide so that you Help yourself can. From inquiries like „I have the radio XYZ and do not know which firmware I should flash“, I ask to refrain. Nobody can answer this question anyway, especially not with the type designation or even a link to a store. Why this is so, is here in the article.
(Android 4.4.4)
Introduction
You have an Android car stereo and want to update it?
Fine!
Good decision!
For example, we have a Pumpkin C0234-DE1-B. Great, we have the exact type there!
Yes, great, right?
But we can forget about it right away, because the type designation doesn’t help us one bit. Take it. 🙂
But that’s only stupid at first glance. A closer look at the non-name Android car radios, on the other hand, reveals many more possibilities than with the mass of „brand devices“.
One of the biggest advantages of the more or less standardized Android radios from China is – besides the price – that they are upgradeable. Updates for branded devices are still released in the first few months with a lot of luck, but these are usually only small bug fixes and not upgrades to the next Android version.
We are not even talking about flexibility without the manufacturer’s constraints. Nor are we talking about the expandability and diverse inputs and outputs that these devices offer. Not a word about the fact that these supposedly cheap devices also get along with every factory steering wheel remote control without expensive adapters.
The Car Play and Android Auto stories are getting quite ridiculous. The manufacturers build short-lived IT hardware into long-lived products (cars). One IT year equals one dog year. After a few years, this is as „modern“ as if you had installed a cassette radio with manual station buttons in your car, to draw a comparison.
But what am I talking about? You know exactly why you bought a Chinese radio and not a branded product.Let’s briefly go into the terminology. I recommend to read them, because they are the basics, which you need to understand the update procedure and the functionality of the radio at all. Further information can be found at the XDA-Developers.
Terms
Please read and understand!
HuiFei / Pure Android /MTCB This is like the graphics cards for the PC: here, the developer (in our case MTC) specifies a reference design, which most manufacturers adopt and only make adjustments to the MCU, or include a few extensions. HuiFei aka Pure Android, or MTCB is therefore a standardized platform, in principle only the mainboard of the radio. These mainboards are built by different manufacturers. However, these manufacturers do not usually build car radios. The car radio manufacturers, in turn, buy these mainboards to match the radios they offer. The front panels, displays and features differ.
MCU The MCU is the microcontroller unit. This is the actual heart of the radio. Similar to the BIOS and the chipset on a computer mainboard. It correctly integrates the hardware. That’s why it’s extremely important to find the right firmware for it. If you download and install the wrong FW, in the worst case the radio can be bricked – it becomes as useful as a brick.
Recovery Similar to the BIOS update tool of a PC. You can get to this area by pressing a special key combination when starting the radio. This environment is the most basic and recommended way to update the MCU and the system of the device. It starts even before the operating system. Unlike the BIOS, nothing can be set here. You can only reflash the OS and/or the MCU and/or delete the cache and/or the data.
Android version We don’t have to pay much attention to the system update. The only important thing here is that we pay attention to the appropriate CPU and the correct resolution of the device. In case of an error, we can simply install a new system update via the recovery – assuming a functioning MCU. Currently, the Andorid flavors 4.4.4 (KitKat) and 5.1.1 (Lollipop) are available for the MTCB devices.
Mainboard The radio’s mainboard is located at the bottom of the device. All the extensions that normal Android devices do not have (DVD drive, video inputs and outputs, etc.) are connected to it. The MCU is also located on the motherboard.
ARM Acorn RISC Machine. This is an architecture (and the current name of the company) developed by the former home computer manufacturer Acorn. It is the most widely used architecture in the world, ahead of the x86s. First introduction was in 1985 in the BBC Master, a home computer. ARM does not manufacture CPUs itself, it develops them and sells the licenses. The manufacturers (Apple, Mediatek (MTK), Rockchip, Allwinner, Qualcomm, Amlogics, etc.) basically click together the desired functionalities of their desired SoC, pay the fees for it and ideally (like Qualcomm) also optimize the design a bit. Most manufacturers do not maintain their own production facilities, but have them produced. SoC The SoC (System on Chip) is what we simply call the processor. However, the SoC also includes the chipset, the controllers and some sensors besides the processor.
SoM System on Module. The SoC with the RAM and the flash memory (on which the Android system is located) is on this board. The driver module for the audio output is often also integrated here. The SoM is usually found behind the display.
MTCD Another reference design of the manufacturer MTC, which is incompatible to the MTCB devices. More information can be found here.
Android Based on Linux. Probably the most widespread operating system for mobile devices. It is full of security holes and should therefore never be used for important tasks (like banking or payment systems). Every manufacturer makes his own Android, so you only get updates from the manufacturer. Exceptions are devices with reference designs or very widespread ones for which there are custom ROMs. The MTCB devices only run Android.
Root / rooted / prerooted Root is the „Helge Hansen, boss of it all“ among Linux systems. Root is allowed to do pretty much everything. So apps with root privileges can access all your data and all the devices‘ functions. Needless to say, an app with dubious intentions can play nasty tricks with it?
Xposed This is a framework (programming framework) that enables an extremely large number of modules to run on rooted devices that vastly expand the functions (and settings). Some custom ROMs have this app pre-installed. These ROMs are then also always rooted. For example, we need the ExposedMTC module to connect the radio with a Bluetooth OBD II adapter, if it does not report with „OBD“ only out of the box. Our adapter reports with „OBDII“ as device name. However, this only affects the Android system itself and not apps like Torque or Fun2Drive, which independently search for BT adapters.
WinCE Outdated and inflexible operating system of car radios. Devices with this OS should be avoided as much as possible.
Mainboard manufacturers Joyous (JY), HuiFei/Kai Ge Le (KGL), Klyde (KLD), Kaiyide (KYD), Hot Audio (HA) and RoadMaster (RM & YZ) are well-known motherboard manufacturers.
Radio manufacturers Erisin, Pumpkin, Navll and Joying should be the most well-known manufacturers of MTCB car radios. Head Unit „Head Unit“ or „Car Head Unit“ is nothing else than what we simply call „car radio“ – but means just the modern and multifunctional touch devices (Car-PC). Custom ROM These are customized ROMs, i.e. system images of the Android system, in which the developers have added further functionalities and pre-installed software.
Malaysk, DSA (dsa8310) and Booroondook Developers of the custom ROMs for the MTCB devices
Dual and Quad Core Denotes how many processor cores the SoC has. RK3066 is the dual core, RK3188 is the quad core from Rockchip. Resolution The MTCB radios usually have a resolution of 800×480 or 1024×600.
Update procedure
How do I find out which mainboard (MCU) is installed in my radio? We go to the settings of the radio and select the last item there: „About this tablet“:
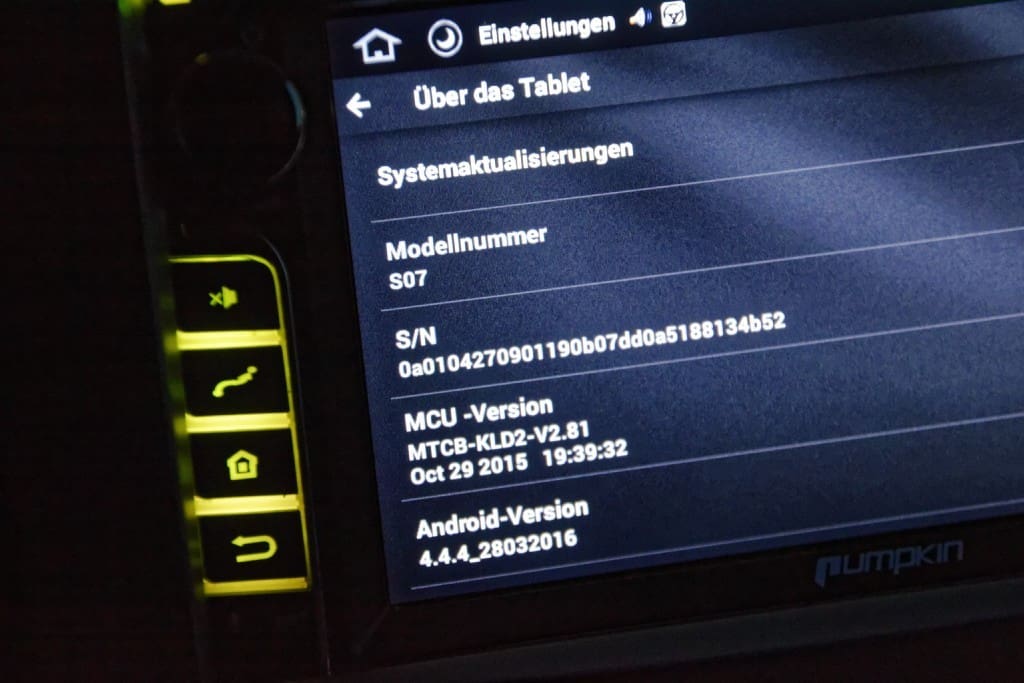
(MCU version)
Our MTCB car radio from Pumpkin has a KLD2 MCU from the mainboard manufacturer Klyde. This MCU must not be confused with the KLD version! KLD2 is NOT KLD! If it says MTCD, or something else, you are completely wrong here and must not follow this manual!
How do I find out the CPU?
Also in „About this tablet“:
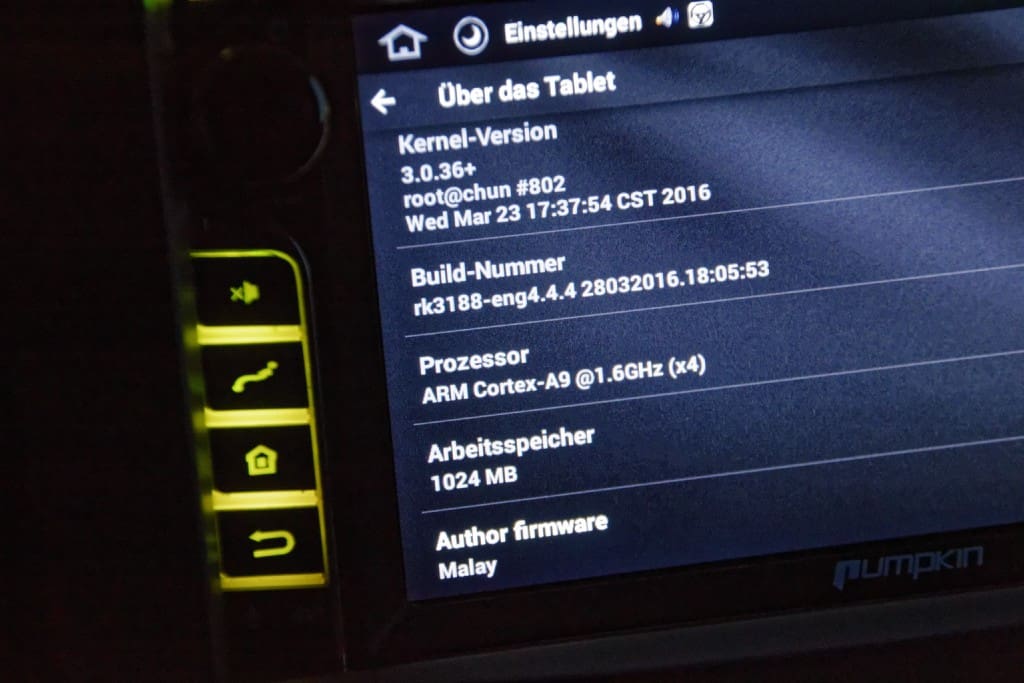
(CPU)
The „Build number“ reveals the quad-core in our case: RK3188. This runs on an Android 4.4.4.
Under „Processor“ we only find the ARM technology on which it is based. Rather uninteresting for the update. If you do not trust this information, you can install and run the apps „Checkrk3188“ or „CPU-Z“, for example.
Where can I find information about the device’s resolution? Either you install the app „CPU-Z“ and have it displayed there, or you simply have a look at the specs that were included in the sale. Our Punpkin has a resolution of 800×480 pixels according to the description on the Pumpkin website.
What do I need to know in the end? The MCU version, the processor, and the resolution of the device. That looks with us (possibly not with you!) as follows: MCU: KLD2 System ROM: RK3188 (Quadcore), 800×480
How and where do we find the appropriate MCU updates? So we found out that our device has a KLD2 MCU (important!). For the MCU we need the name KLD2 (or whatever MCU you have). With that, we look here for the appropriate firmware. I downloaded the newest one. This eliminated the slight jerking in the video display of the front and rear camera.
How and where do we find the appropriate system updates? An overview of all firmwares for the MTCB devices can be found here. But I’m especially interested in the custom firmwares with Android 5.1.1, a Rockchip QuadCore 3188 and a resolution of 800×480 After some tests, I ended up with the custom ROM 5.1.1 with Xposed from DSA. This runs by far the best for me. See conclusion
Create update media We need a FAT(32) formatted USB stick or a micro SD card. On this we copy the files – mcu-img – update.img If we want to update only the system or only the MCU, we can also do without the other file.
Insert the update medium We insert the USB stick into a USB port on the radio. If we have a micro SD card, it is mandatory to insert it into the GPS SD slot of the radio.
Carry out the update We turn on the radio, release the power button briefly and press it again for about 5 seconds. Other MTCB devices need a combination of reset button and power button. The proof of the pudding is in the eating. Now we come to the Recovery. The operation of the recovery is usually done with volume up/down (rotary knob) for scrolling and the power button (press rotary knob) for selection. Pressing briefly jumps to the next menu item, pressing longer selects. Here we select our disk, preferably with the option to wipe all. This corresponds to deleting the user settings as well as deleting the (Dalvik) cache.
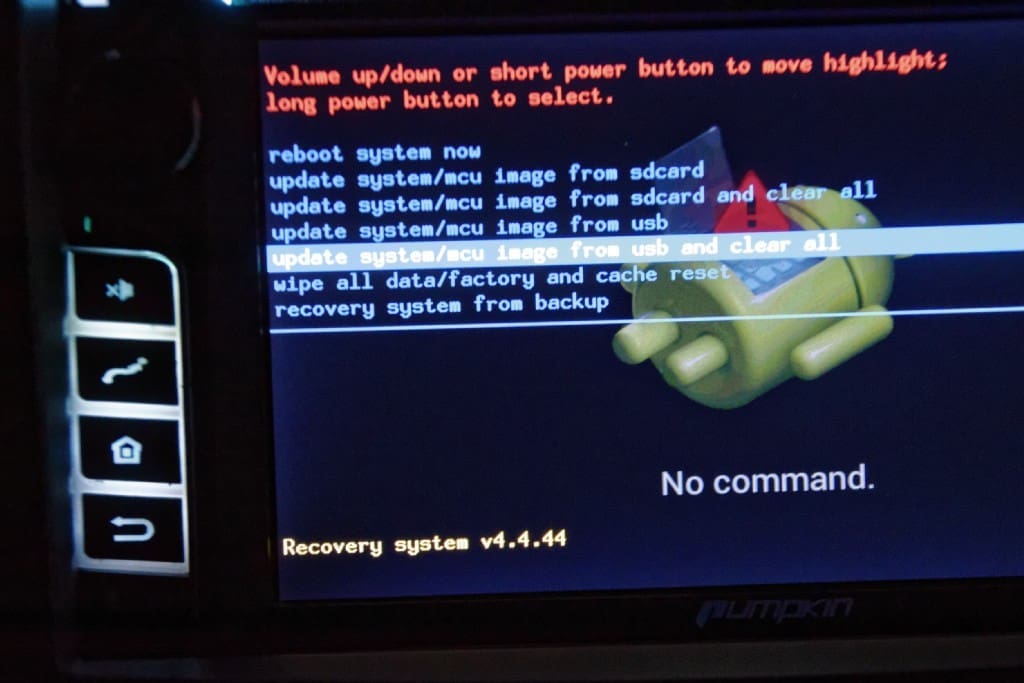
(Revovery menu)
Afterwards the system looks on the inserted data medium still the mcu.img and/or the update.img and updates the found.
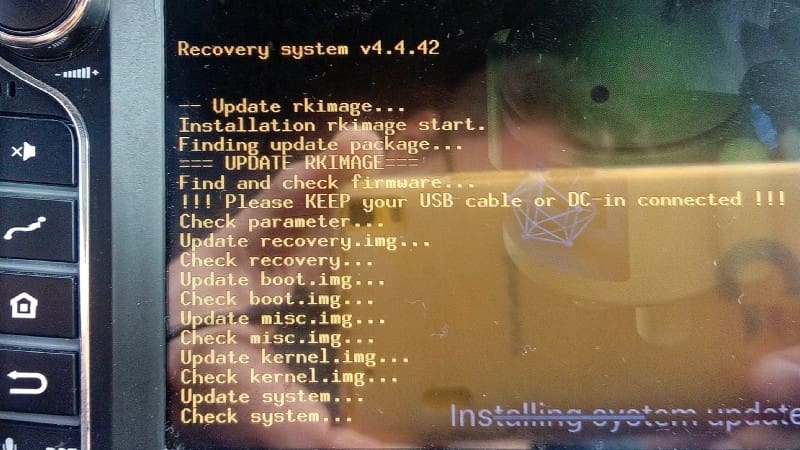
(Update running)
During the update we watch for error messages. If everything runs cleanly, the device switches off at the end. Now we remove the data medium and, if necessary, insert the navigation SD card into the GPS slot again. If we have not deleted the data and the cache, we have to go back to recovery and do this, otherwise the system will not boot.
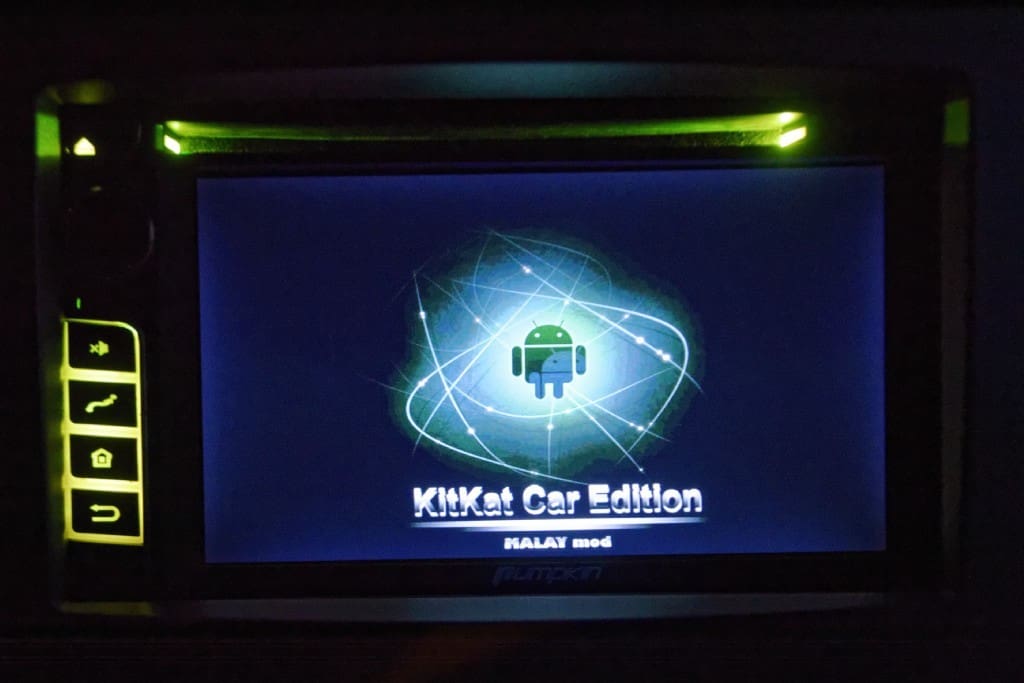
First boot and basic configuration The first boot takes significantly longer than the usual boot. It can take three or four minutes for the system to re-initialize.
Old basic settings like the key light color, the steering wheel key assignment or the boot logo should not be lost. However, you will have to set the language again. Some custom ROM developers have preset their own language. Less funny with Cyrillic characters. There is an app for configuring steering wheel buttons and the radio’s button colors. To change the boot logo to that of your car brand, you have to go into the factory settings (under „Settings“). The password is usually „126“.
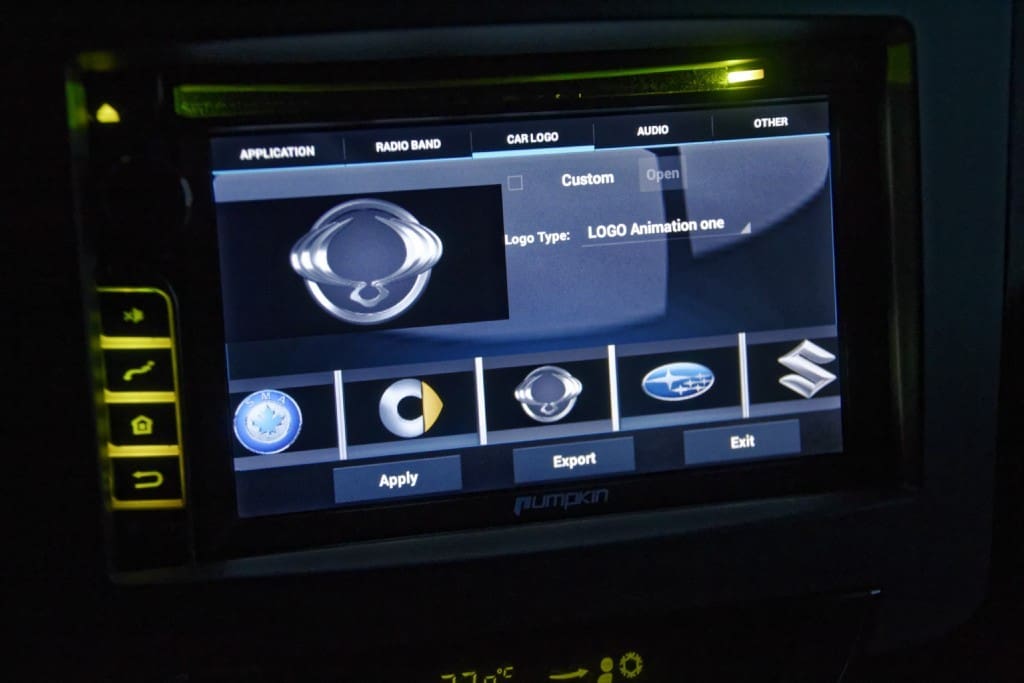
(Factory settings menu)
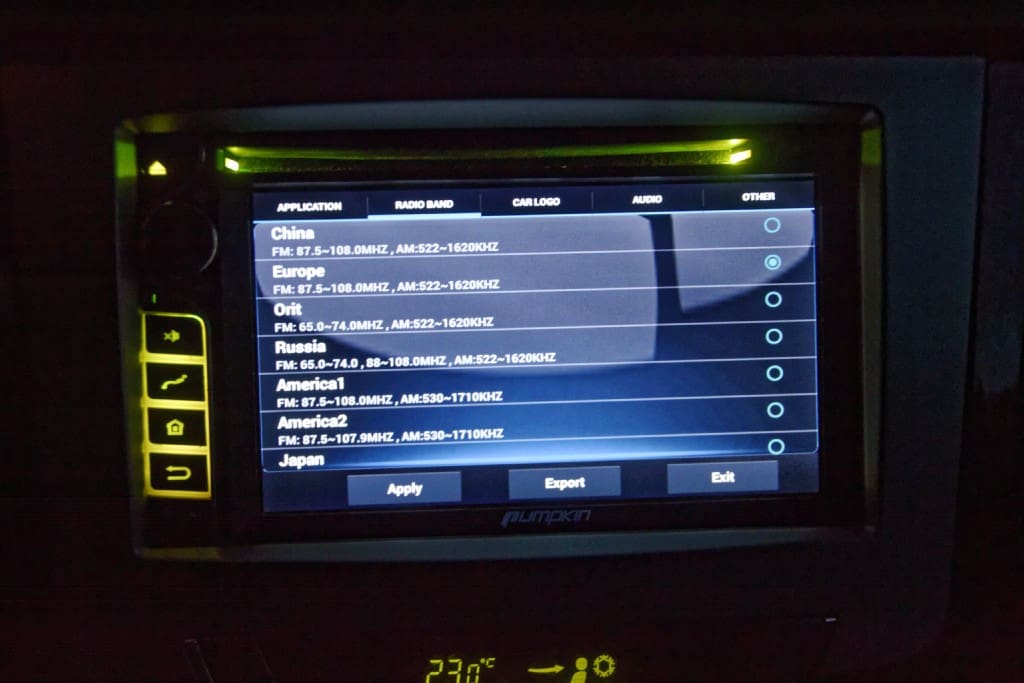
(Tuner settings)
For Punpkin devices with preinstalled iGo you now have to open the Apk installer or the file browser, click to the iGo folder on the GPS card and install the iGo.apk. IGo has saved your old settings on the GPS card, so everything is automagically set back to how it was before. It is also worth taking a look at the OEM or APK folders on the device itself, because the custom ROM developers often have useful tools stored there that have not been preinstalled yet.
My conclusion
It is not easy. Every firmware has its charm at first. It offers a lot of new things to discover. Surprises with a new design or a complete system update. After a few attempts and many hours of testing, I am back to 4.4.4, but with a custom ROM from Malaysk (the latest FUSE, Xposed).
Why not 5.1.1? It doesn’t run 100% clean and you don’t notice any difference in speed or operation. On the other hand, I had strange problems with Bluetooth, the button lights and vehicle-specific logo with 5.1.1. Some ROMs just ran grottily on my device, for example the ROM from Boorondook (FUSE, Xposed). That put in seconds of thought in the first 10 minutes after startup. It hung for a few seconds every now and then, and every time you typed something you could say „twenty-one“ until something happened. The media player kept crashing. But this does not have to be the case with every MTCB device, just give it a try.
The next project is a dashcam that doubles as a camera for ionroad or acodriver, logging videos and data. After all, the radio doesn’t always have to be on.
What I’m also working on is either hooking up a Garmin HUD (costs money) or getting a mirroring of the radio screen to the phone screen. I can’t do anything with the iGo’s drivel (customized by Basarsoft), „Get in order at …. Meters.“ My concentration is just not enough for all the filler words in strange environments.
I prefer an unfriendly „Turn right in 200 meters“. Besides, even on highways, it often announces the turn only 100 meters in advance. That is way, way too short. I have exhausted all GUI settings. It remains only editing the config files. Since I have but little Bock on it. I just want to have a display in front of my nose again and not on the center console. I can look better than I can listen. I am just a man.
Yes, with Somehow-Cast it works, of course. BUT: either only up to 4.4 or 5.1 or only with 6.0. An app that runs on 4 and 6 I have not found – and if there is, then it needs an existing WLAN. No, Android does not know ad hoc WLAN. If one of the devices sets up a hotspot, that doesn’t work either. This has cost me hours of my life and a lot of nerves.
Installation of the radio
The installation of such a car radio I have explained in a post using the SsangYong Rexton. But this is actually the same for every car. Except for VAG vehicles, which still need gimmicks with an antenna amplifier and then still have a rather mediocre reception.
Further links
You want to know more?
Looking for suitable forums to help yourself?
Need fresh apps and firmawares?
Here you go:
HuiFei-XDA-Developers-Wiki
HuiFei apps and firmwares
China RNS forum with DL section
Discussion about such updates at Android-Help